- Table of Contents
- Why Laminate Countertops Are A Great DIY Project
- Before You Begin
- Installing Laminate Countertops
- Step 1: Install Build-Up Strips
- Why Build-Up Strips Matter
- Step 2: Scribe Countertop
- Step 3: Prepare Openings
- Step 4: Assemble Miter And Field Joints
- Step 5: Fasten Countertop To Build-Up Strips
- Step 6: Seal Backsplash
- Step 7: Seal Countertop Seams
- Common Installation Mistakes
- Frequently Asked Questions
- Ready To Start?
Research & Planning
How to Install Laminate Countertops: A Step-by-Step DIY Guide
Learning how to install laminate countertops is one of the easiest ways to transform your kitchen, bathroom, laundry room, or workspace without taking on the cost of professional installation. With the right preparation, a few common tools, and a little patience, many homeowners can successfully install laminate countertops themselves over the course of a weekend.
Laminate countertops have long been a favorite among DIYers because they're affordable, lightweight, durable, and designed for straightforward installation. Whether you're replacing an outdated countertop or completing a brand new cabinet installation, following the proper installation steps will help ensure a professional looking finished product that performs beautifully for years to come.
In this step-by-step guide, we'll walk you through the laminate countertop installation process, share helpful tips to make your project go more smoothly, and answer some of the most common questions homeowners have before getting started.
Looking for a printable version to keep by your side while you work? Download our Laminate Countertop Installation Guide (PDF) for an easy-to-follow reference during your installation.
Why Laminate Countertops Are a Great DIY Project
When it comes to home improvement projects, laminate countertops are one of the most approachable surfaces for DIY installation. They are designed to simplify the installation process while still delivering a beautiful, finished look.
Whether you're updating a kitchen, refreshing a bathroom vanity, finishing a laundry room, or creating a functional workplace, laminate countertops offer an excellent balance of style, performance, and value.
Here are just a few reasons homeowners continue to choose laminate countertops:
- DIY-friendly installation. Most laminate countertop installations can be completed using common household tools and careful planning.
- Affordable without sacrificing style. Modern laminate designs mimic the look of natural stone, marble, and other premium materials at a fraction of the cost.
- Lightweight and easy to handle. Compared to stone surfaces, laminate countertops are much easier to transport, position, and install.
- Durable for everyday living. Laminate countertops are built to stand up to the demands of busy households while remaining easy to clean and maintain.
- Versatile for nearly any space. Laminate countertops are a great choice for kitchens, bathrooms, laundry rooms, mudrooms, home offices, workshops, and more.
At CustomCraft Countertops®, our laminate countertops are designed with today's homeowner in mind. Featuring stylish, on-trend designs and DIY friendly installation, we make it easier than ever to create a space you'll love.
Before You Begin
A successful countertop installation starts long before the first screw is driven. Taking time to properly prepare your workspace, inspect your materials, and verify that your cabinets are ready for installation will help prevent unnecessary delays and ensure a smoother project from start to finish.
Gather Your Tools
Before you begin installing your laminate countertops, gather the tools and materials you'll need throughout the project. Having everything within reach will help keep the installation moving efficiently.
Some of the most commonly used tools include:
- Tape Measure
- Drill
- Pencil
- Belt Sander
- Philips Screw Driver
- Square Drive (Drill Bit)
- Jig Saw Utility Knife
- Wrench 7/16"
- Safety Glasses
- Painters Tape
Depending on your kitchen layout or countertop, additional hardware or tools may also be required. Be sure to review your installation materials before getting started.
Preparing Your Cabinets
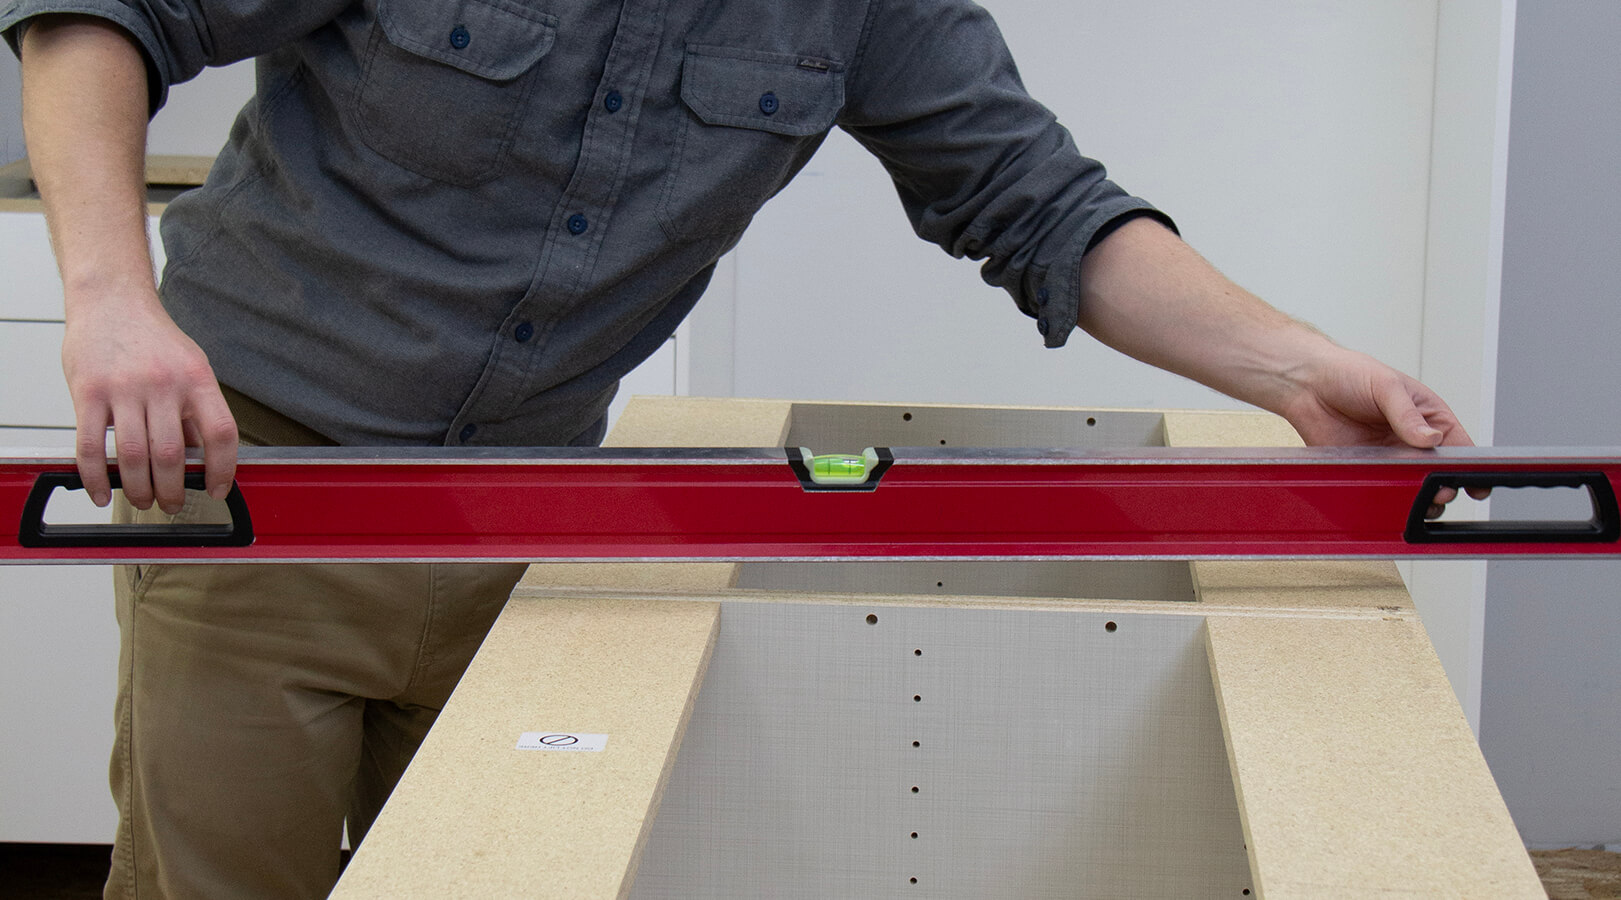
Before installing any build-up strips, check to see if the cabinets are level. If they can be adjusted, make those adjustments first.
If the cabinets cannot be leveled completely through adjustment, shims may be needed later to help correct minor variation.
Taking the time to verify cabinet level now helps create a smoother installation and reduces the risk of fit issues once the countertop is in place.
Some other things to check on your cabinets before you begin installation:
- Securely fastened together
- Firmly anchored to the wall
- Level from front to back and side to side
- Square and properly aligned
If your cabinets are out of level or not securely fastened, your countertop may not fit correctly, seams may not align properly, and additional adjustments may be needed during installation.
Pro Tip: Use a level to check several locations across your cabinet run before installing your countertop. Correcting any issues now will save time and frustration later.
Inspect Your Countertop Pieces
Before making any cuts or permanently securing your countertop, carefully unpack each section and inspect it for shipping damage or anything missing or manufactured incorrectly.
Lay the countertop sections on top of the cabinets to familiarize yourself with the layout and verify that each piece has been received. That initial "dry fit" is an important part of the installation process and allows you to confirm seam locations, overhangs, and overall fit before moving on to the installation steps.
Taking a few extra minutes to inspect everything before you begin can help you avoid unexpected surprises and keep your project on schedule.
Installing Your Laminate Countertop
Once your cabinets are prepared and your countertop sections have been inspected, the next step is to install any required build-up strips before setting the countertop in place. Build-up strips help create proper support and ensure the countertop sits at the correct height and overhang.
The exact installation method will vary depending on whether you are working with full access cabinets or standard cabinets, so it is important to follow the correct process for your cabinet style.
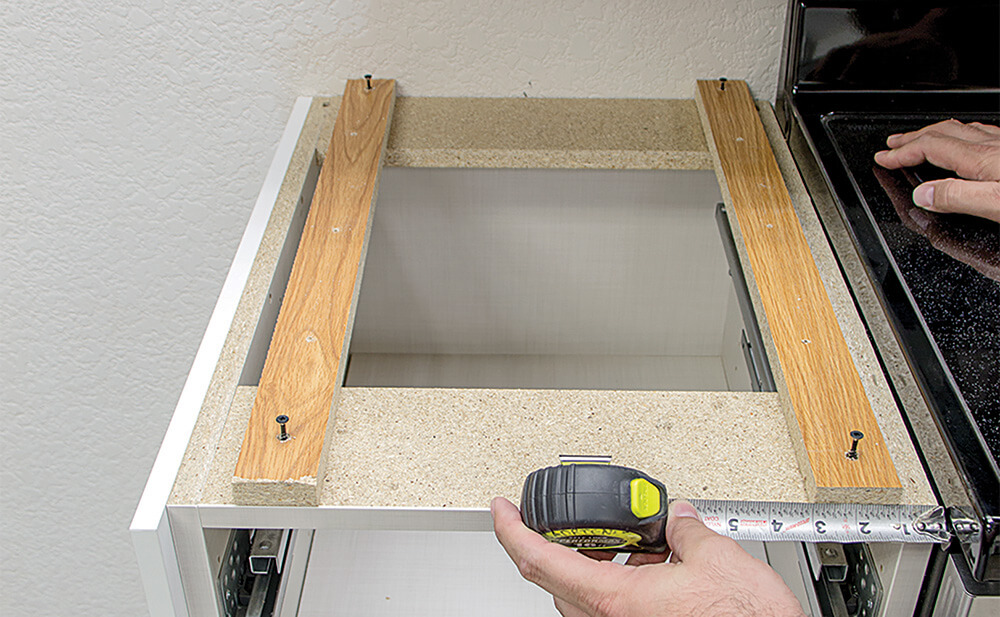
Step 1: Install Build-Up Strips to Cabinets
Full Access Cabinetry
If you're installing on a frameless or full access cabinet system, additional build-up strips and 1-1/4" screws may be required. These materials can typically be purchased at your local Menards store.
Begin by measuring the width of the build-down stick next to the end cap located on the underside of the countertop. Use that measurement to determine placement for your build-up strip.
Next:
- Measure in from the end of the cabinet the distance of the build-down stick plus 1/4" and mark the location
- Pre-drill the front and back of the build-up strip where it will fasten to the cabinet
- Pre-drill three additional holes spaced evenly across the middle of the strip for screw installation into the bottom of the countertop
- Install the build-up strip using 1-1/4" drywall screws at the marked locations
If two cabinets meet at a joint, install a build-up strip on either side of the joint. Be sure to leave enough room for the screws that will later fasten the countertop from underneath.
When installing build-up strips around a sink base, measure the sink opening first to make sure the strip is positioned far enough away to avoid interfering with sink installation.
Framed Cabinetry
For framed cabinetry systems, begin the same way by checking that the cabinets are level. If needed, use shims to later to correct any areas that cannot be adjusted.
Then:
- Pre-drill holes in the front and back of the build-up strips.
- Attach the strips to the top of the cabinet face and back frame using 1-1/4" drywall screws.
- Place build-up strips every two feet along the cabinet run.
- Position the first and last strips 2? from the end of the cabinet run to offset the build-down for any end caps.
As with full access cabinets, take care around sink bases. Measure the sink opening before installing the strip to make sure it will not interfere with sink installation.
Why Build-Up Strips Matter
Build-up strips help support the countertop properly and ensure the finished installation sits at the correct height and alignment. They are a small but important part of the countertop installation process, especially when working with standard/framed or full access/ frameless cabinet systems that require added support.
Installing them correctly before the laminate countertop goes in place helps create a more stable, professional looking result and makes the rest of the installation much easier to complete.
Step 2: Scribe the Countertop for a Better Fit
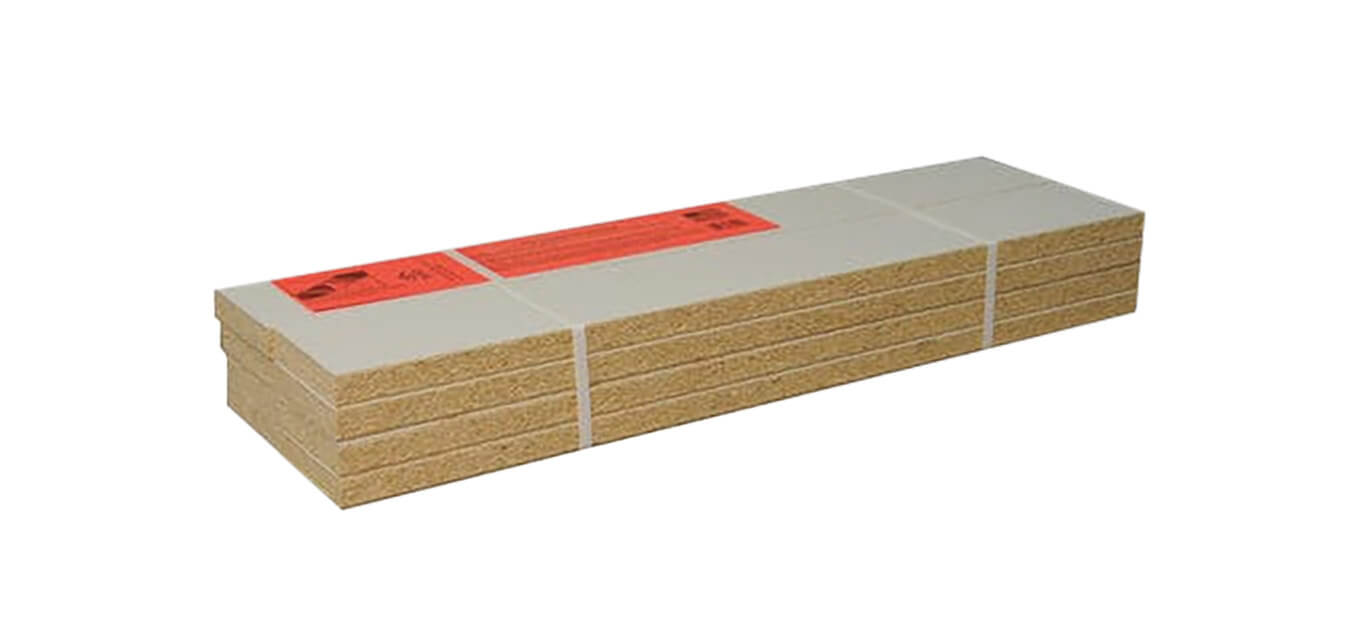
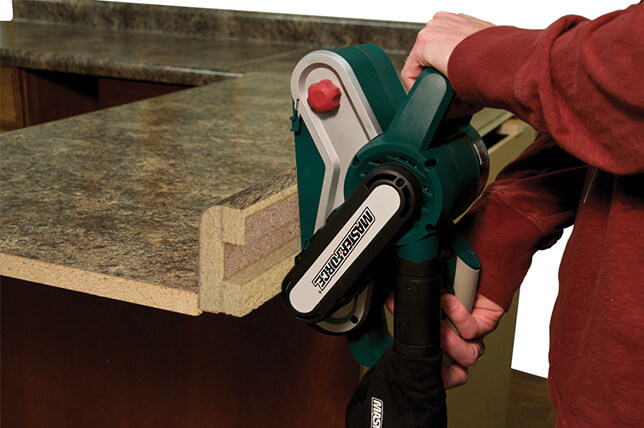
Because walls are rarely perfectly straight, you may need to scribe the countertop to create a tighter fit against the wall.
If needed:
- Position the countertop in its final location
- Trace the wall contour onto the backsplash area
- Carefully trim or sand only as much material as necessary
- Test the fit often to avoid removing too much material & repeat the process until desired fit
This step takes patience, but it helps create a cleaner finished appearance and reduces visible gaps along the wall.
Step 3: Prepare Sink and Appliance Openings
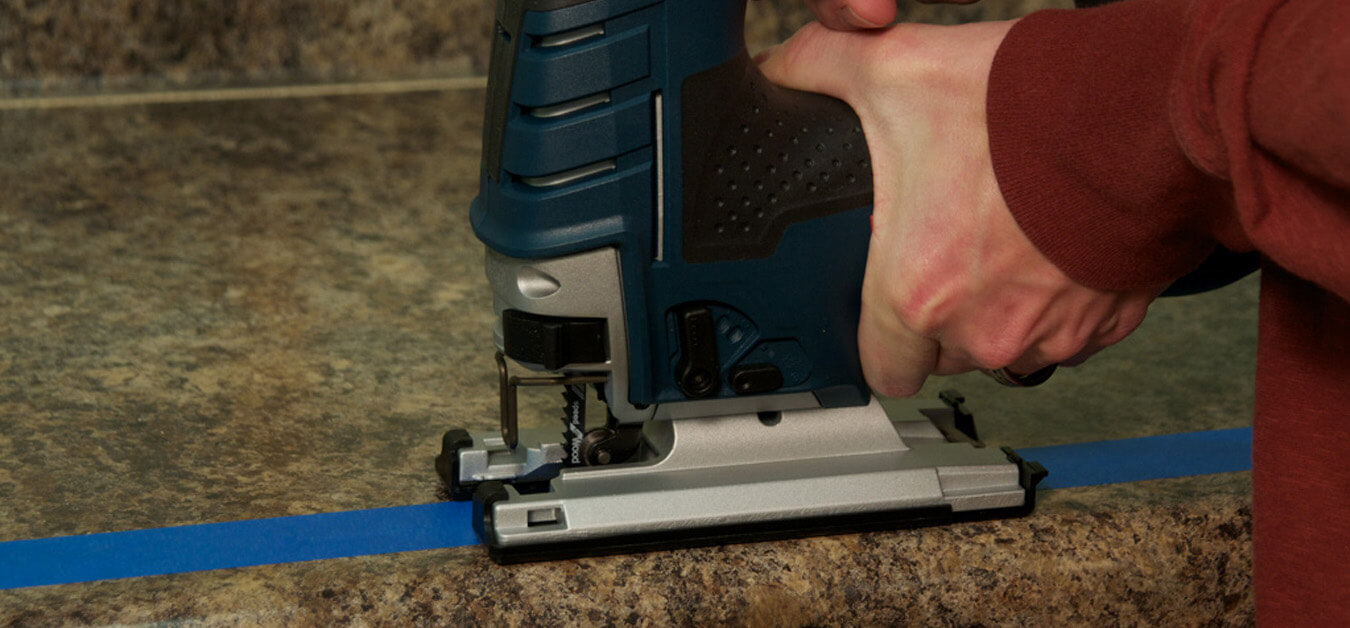
If your installation includes a sink opening or another cutout, make those cuts before permanently fastening the countertop.
Before cutting:
- Confirm all measurements carefully
- Apply painter's tape along the cut line to help reduce chipping
- Drill starter holes at the corners of the opening
- Use a jigsaw with a fine-tooth blade
- Support the cutout as you finish the cut to avoid it dropping and causing damage
Always take your time with this step. A careful cut now is much easier than trying to correct a cutout that is too large.
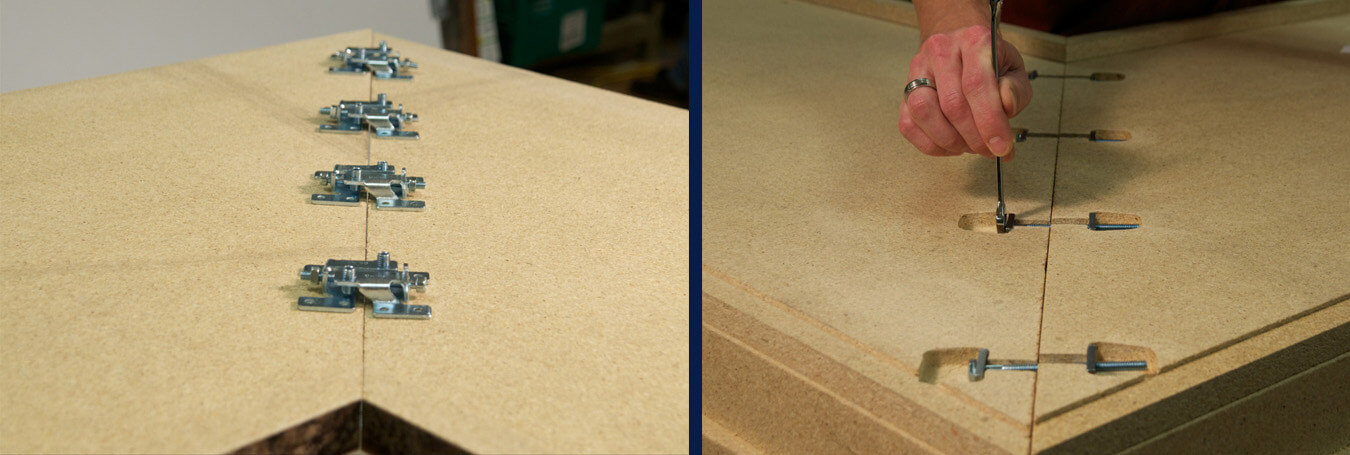
Step 4: Assemble Miter and Field Joints
If your installation includes multiple countertop sections, such as an L-shaped layout or a run with a field seam, the joints must be assembled carefully to create a tight, professional look and finish.
Whenever possible, assemble the top upside down in a suitable area on saw horses or other level supports. Be sure to protect the top surface to help prevent scratches while you work.
Using Dual Action Fasteners
Begin by attaching the fasteners in a slightly offset pattern at an equal distance from front to back. With the long bolt loose, each plate should sit about 1/8" from the miter edge. This offset pattern helps create the angular clamping tension needed to pull the seam tightly together.
After the fasteners are in place, use a clamp to help with alignment. Once all of the fasteners have been applied, remove the clamp and loosen the two halves to prepare for gluing.
Apply a liberal amount of miter glue using a clean shim or other thin piece of wood. The glue should squeeze out of the miter joint when the seam is properly assembled.
Next, carefully flip the countertop right side up and visually inspect the seam. Massage the two backsplashes into final alignment by flexing them slightly back and fourth until the seam is fully flush.
Then snug all of the fasteners, being careful not to over tighten them. Over tightening can cause the laminate to separate on the face side of the joint. Once the seam is snug, set the height with the adjusting screw as needed.
In some cases, weights may also be necessary to help force the miter tight at the surface. You should see glue squeezing out along the seam. Allow the glue to dry for at least 60 minutes before moving the countertop.
Using Miter Bolts
If your countertop installation uses miter bolts instead, apply a liberal amount of miter glue to the edge of each piece before assembly. Install the supplied biscuits, then slide the pieces together.
Snug the miter bolts with a wrench, but do not fully tighten them right away. The mitered pieces should hold together securely, yet still be movable for final alignment with a sharp blow if needed.
Wipe away any excess glue as you work.
Next, locate the high side of each miter from the laminate side and gently pound down the high side with a hammer and wood block. After adjusting, tighten the closest miter bolt. Repeat this process along the full length of the seam until the joint is aligned properly.
Before moving the countertop, the adhesive in the joint must dry for a minimum of 60 minutes. Once the joint has dried, further adjustments will not be possible.
Take your time with this step. A well assembled joint makes a major difference in both the look and the long-term performance of the countertop.
Step 5: Fasten the Countertop to the Build-Up Strips
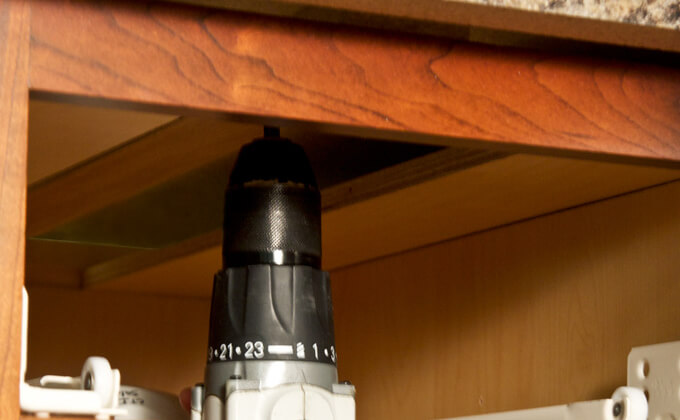
Once all countertop sections have been properly aligned and any miter or field joints have been assembled, you?re ready to secure the countertop to the cabinet base.
Carefully position the countertop in its final location, confirming that the overhang is consistent, the backsplash fits tightly against the wall, and all seams remain properly aligned.
Fasten the countertop by driving three 1-1/4" black drywall screws through each build-up strip and into the underside of the countertop.
IMPORTANT: Only use the recommended 1-1/4" screws. Longer screws can puncture the finished surface of the countertop, resulting in permanent damage.
As you secure the countertop:
- Tighten the screws until they are snug, but avoid over tightening
- Recheck seam alignment as your work across the countertop
- Verify that the front overhang remains even along the cabinet run
If your cabinets were not perfectly level during preparation, use shims where needed to provide proper support before fully tightening the screws.
Work your way around the countertop gradually rather than fastening one area completely before moving to the next. This allows you to make small adjustments and helps ensure the countertop stays properly aligned throughout the installation.
Step 6: Seal the Backsplash with Color-Matched Caulk
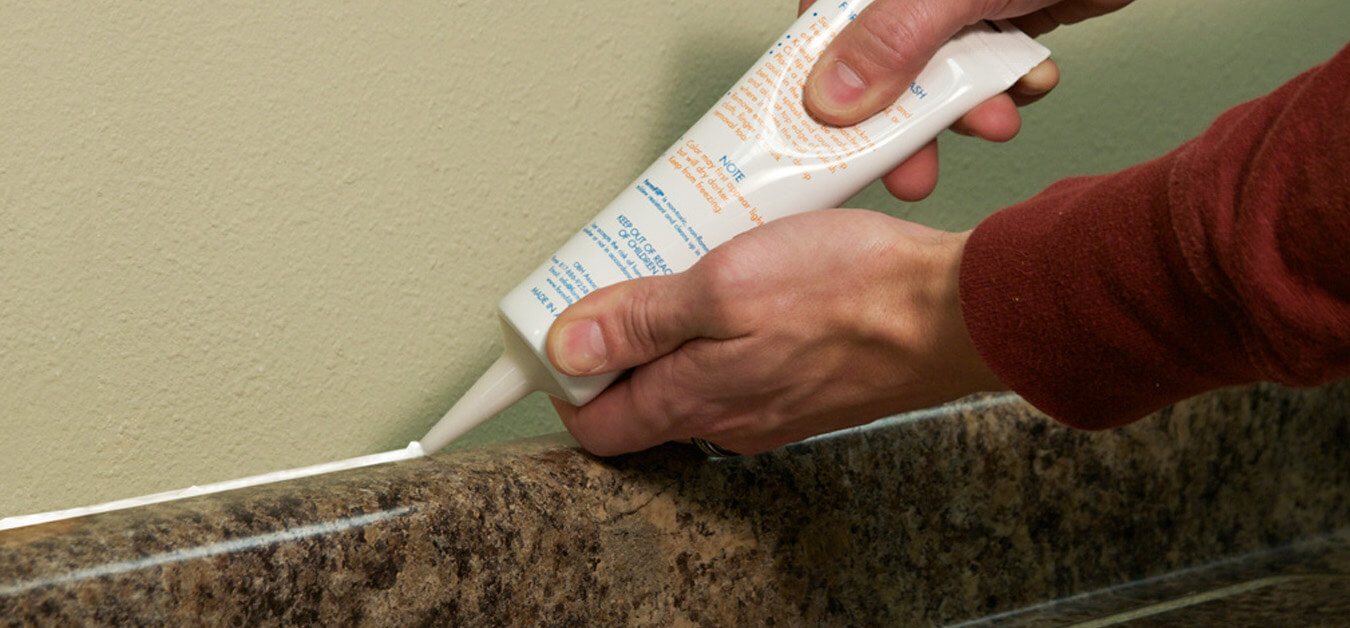
The final step is sealing the joint where the backsplash meets the wall. This helps create a finished appearance while protecting against moisture that could work its way behind the countertop over time.
Before applying caulk:
- Make sure the countertop and wall surfaces are clean and free of dust, dirt, oil, and debris
- Knead the tube of color-matched caulk before opening to ensure the material is properly mixed
Apply a continuous bead of caulk along the top of the backsplash where it meets the wall. Then, using a damp finger and moderate pressure, smooth the bead to create a clean, consistent finish while removing any excess caulk.
Keep in mind that color-matched caulk will naturally shrink slightly as it cures and may dry a bit darker than its original color.
Allow the caulk to cure according to the manufacturer's recommendations before exposing the area to moisture.
Step 7: Seal Countertop Seams with Color-Matched Seam Filler
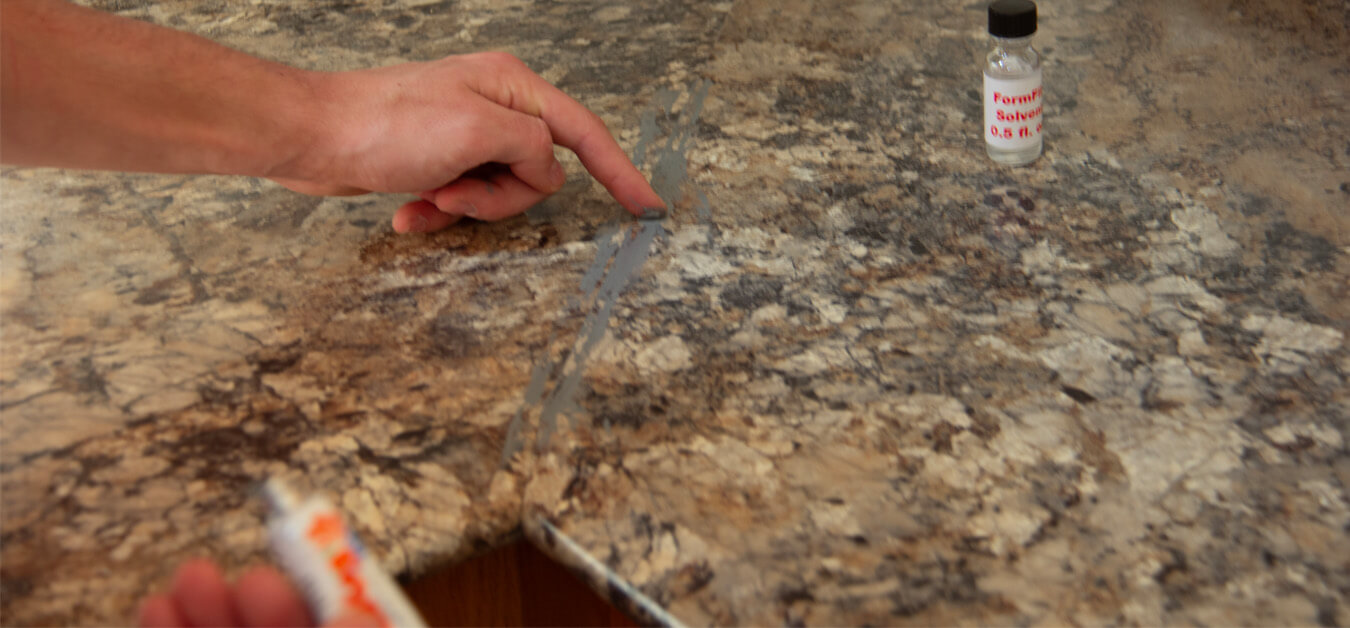
Once the backsplash has been caulked, take a few extra minutes to seal any exposed countertop seams with the supplied color-matched seam filler. This step not only helps create a cleaner, more finished appearance, but also protects the countertop from moisture intrusion.
Begin by thoroughly cleaning the seam with soap and water, making sure the area is free of dust, dirt, and debris before applying the seam filler.
Using the supplied applicator, apply the seam filler directly into the joint. Then, use your finger to draw the material across the seam, helping force it into any small gaps or voids.
After the seam has been filled:
- Wipe away any excess material with a clean cloth and warm water
- Allow the repair to dry to the touch for approximately 1-2 hours
- Full cure typically occurs within 24 hours, depending on temperature and humidity
Because the seam filler is water-based, a small amount of shrinkage may occur as it cures. If the repair settles below the surface of the countertop, simply apply an additional coat until the seam is filled to a satisfactory level. Finish by lightly blending the repaired area with a clean cloth and warm water for a smooth, consistent appearance.
IMPORTANT: Failure to use seam filler on seams will void warranty. Properly sealed seams help prevent moisture from reaching the countertop core, reducing the risk of swelling or delamination over time.
Before considering your project complete, inspect all seams one final time. Any small gaps should be sealed before the countertop is put into regular use. This final step helps protect your investment and contributes to a clean, professional-looking finished installation.
Common Laminate Countertop Installation Mistakes to Avoid
Installing laminate countertops is a project many homeowners can successfully complete themselves. By taking your time, following the recommended installation steps, and paying attention to the details, you can achieve a professional-looking result that will perform beautifully for years to come.
While every installation is unique, there are a few common mistakes that can affect the appearance, durability, or long-term performance of your countertop. Keeping these tips in mind can help your project go as smoothly as possible.
Skipping the Cabinet Level Check
Before installation begins, always verify that your cabinets are level from front to back and side to side. Even minor variations can affect countertop alignment, create uneven seams, and make installation more difficult.
If adjustments can't be made to the cabinets themselves, use shims where needed to provide proper support before fastening the countertop in place.
Using Screws That Are Too Long
When attaching the countertop to the build-up strips, only use the recommended 1-1/4" drywall screws.
Using longer screws can puncture the finished laminate surface, causing permanent damage that cannot be repaired. Taking a moment to verify screw length before installation can help prevent an unnecessary setback.
Rushing Through Miter Joint Assembly
A clean, tight seam doesn't happen by accident. It requires careful alignment, the proper amount of miter glue, and patience while tightening the fasteners.
Avoid over tightening the fasteners, as this can cause the laminate to separate on the face of the joint. Tighten each fastener gradually while checking the seam frequently to ensure the countertop remains flush.
Cutting Too Much Material At Once
Whether you're scribing the backsplash to fit an uneven wall or cutting an opening for a sink, remember that it's always easier to remove a little more material than it is to replace material that's already been cut away.
Measure carefully, test fit often, and make gradual adjustments throughout the process.
Skipping the Finishing Steps
It's tempting to consider the project finished once the countertop is secured to the cabinets, but the final finishing steps are just as important.
Applying color-matched caulk where the backsplash meets the wall helps prevent moisture from working its way behind the countertop, while color-matched seam filler protects exposed joints from water intrusion and created a more finished appearance.
These simple steps help improve both the appearance and the longevity of your countertop.
Not Allowing Adhesives to Fully Cure
Miter glue, seam filler, and color-matched caulk all require adequate curing time before the countertop is put into regular use.
Although it can be exciting to start using your new space right away, allowing these materials to cure according to the manufacturer's recommendations helps create stronger joints, better moisture protection, and a longer lasting installation.
Frequently Asked Questions About Installing Laminate Countertop
Whether you're planning your first countertop installation or just looking for a few final tips before getting started, these are some of the most common questions homeowners ask.
Can I install laminate countertops myself?
Yes, laminate countertops are considered one of the most DIY-friendly countertop options available. With careful measurements, the proper tools, and attention to the installation instructions, many homeowners can successfully complete the project themselves.
How long does it take to install laminate countertops?
Installation time depends on the size and complexity of your project. A simple vanity top may take only a few hours, while a full kitchen installation with miter joints, sink cutouts, and backsplash finishing may take a full weekend.
What tools do I need to install laminate countertops?
Most installations require common household tools, including a tape measure, drill, pencil, belt sander, screwdriver, square drive, jig saw utility knife, wrench, and safety glasses. Be sure to review your installation guide before beginning your project.
Why are build-up strips important?
Build-up strips provide proper support for the countertop and help maintain the correct installation height. They also create secure fastening points between the cabinets and the countertop, helping ensure a stable, long lasting installation.
Can laminate countertops be cut after purchase?
Yes. Laminate countertops can be trimmed and modified during installation to accommodate sinks, appliances, and wall irregularities. Always measure carefully before making any cuts and use the proper tools to help achieve clean, accurate results.
What type of screws should I use?
Use only the recommended 1-1/4" drywall screws when fastening the countertop through the build-up strips. Longer screws can puncture the laminate surface and permanently damage the countertop.
Why is seam filler important?
Seam filler does more than improve the appearance of countertop joints. It helps seal exposed seams against moisture, reducing the risk of swelling or delamination within the countertop core. Properly sealing seams is an important part of a successful installation.
How long should miter glue, seam filler, and caulk cure?
Curing times vary depending on the product, temperature, and humidity. As a general guideline, miter glue should cure for at least 60 minutes before moving the countertop, while seam filler typically dries to the touch within 1-2 hours and reaches full cure in approximately 24 hours. Always follow the product instructions included with the installation kit.
How soon can I use my countertop after installation?
Once all adhesives, seam filler, and caulk have been fully cured, your countertop is ready for normal everyday use. Giving these products adequate time to set helps ensure the strongest possible installation.
How do I care for my new laminate countertops?
Routine cleaning with mild soap and water is usually all that's needed to keep laminate countertops looking their best. Avoid abrasive cleaners and always wipe up standing water promptly. For additional care tips, visit our Laminate Countertop Care & Maintenance Guide
Ready to Start Your Project?
Installing laminate countertops is a rewarding DIY project that can dramatically update the look and function of your kitchen, bathroom, laundry room, or workspace. By following the proper installation steps and taking your time throughout the process, you can achieve a beautiful, professional-looking result that will provide years of dependable performance.
For additional support, be sure to download our Laminate Countertop Installation Guide and explore our installation videos for helpful demonstrations and expert tips. Whether you're preparing for your first installation or simply looking for a quick reference along the way, we're here to help make your project a success.